Ubuntu as a VM Gateway in a test lab
Author - Harshal Chandorkar

I thought of writing this tutorial because I spent alot of time trying to get this thing to work. But when all other methods failed I tried with the basics and it worked like a charm. So what are we doing today? Well the set up that I have is simple:

Internet → External Firewall → Internal Firewall/Router → VMWare Esxi → A lot of vm machines :)

What was my objective? To have a separate network of VM’s that will not mess with my LAN
How to achieve? Actually there are various different ways. The ones I tried are as follows:
  1. DDWRT as a VM Appliance
  2. pfSense as a VM Appliance
  3. Any other router with x86 image as an appliance
  4. I chose Ubuntu 14.04 [✓]
So far so good? I won’t elaborate here how to install Ubuntu on a vmware esxi as there are hundreds of tutorial available. The thing to keep in mind during the installation because this machine will work as a gateway therefore it will need two network interface cards. Hopefully now you have a Ubuntu 14.04 machine with 2 network interfaces card ready. I assigned 1 GB ram to this machine you may choose to increase decrease and see for yourself how it performs.

Ok so now whats next? We need to configure this machine to behave as a gateway. Lets do it.


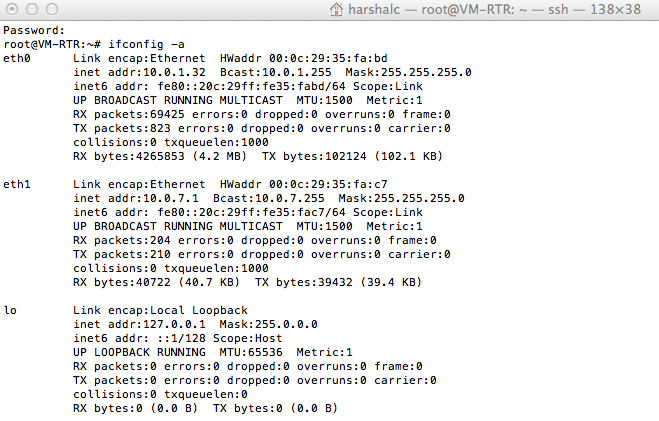
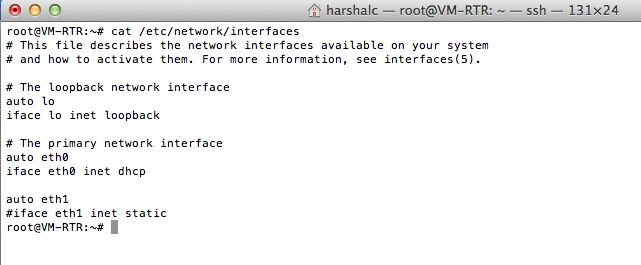
Is that how your ifconfig looks like? forget the ips but there should be two interfaces. My eth0 works as a WAN (External) and eth1 works as LAN (Internal).
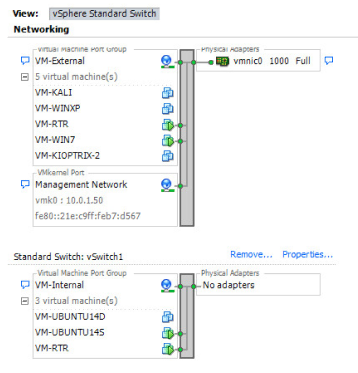
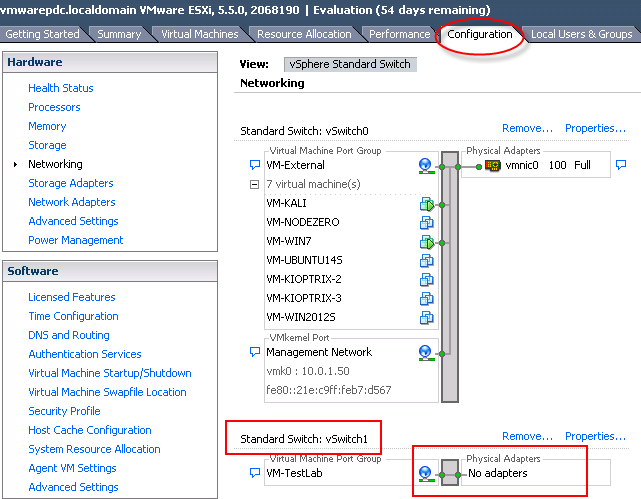
Now lets take a quick look within esxi network configuration. From the vcenter
vcenter → select esxi host → right pane “configuration” → select “networking”

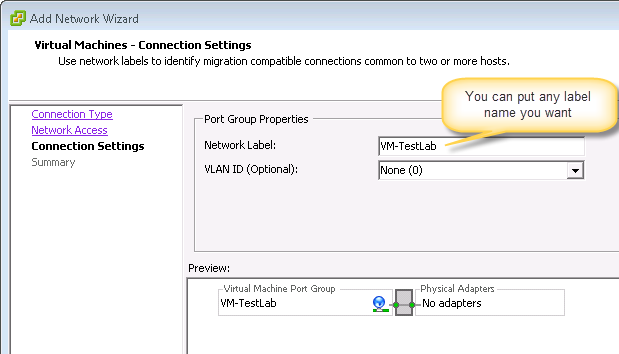
This should bring you to the following view. If you haven’t created something like “vSwithch1” then do it.
Stay on this pane → top right select “add networking” → uncheck all adapters (no physical adapters should be connected)


After you have configured your switch through the wizard, head to your vcenter → select esxi host → right pane “configuration” → select “networking” - it should look something like the figure below:


Now start assigning the new adapter VM-TestLab to the new machines that you have configured. In my case I named it VM-Internal. I created 2 VMs after this
  1. VM-RTR as you can make out from the name being the router (This is Ubuntu Server 14.04 LTS with 2 NIC cards.)
  2. VM-UBUNTU14D being ubuntu desktop for testing browser, internet websites etc. after the VM-RTR is configured. This one with one interface card VM-Internal/VM-TestLab or whatever you named it as. 
Now lets begin the fun. But just before you want to start firing the commands on the terminal take a look at how the network looks like in the following screenshot.

So all good till now? Cool. I won’t narrate here how to install Ubuntu on vm because you already know or there are hundreds or tutorial out there that can tell you this. Once you are up and running, then first things first. Fire up your terminal and run (You will need root access to VM-RTR or your router machine):

root@VM-RTR:~# cat /etc/network/interfaces


If you do not see anything there open up the same file in nano or your favourite editor:
root@VM-RTR:~# nano /etc/network/interfaces
and after the loopback type the following two enteries (In my case eth0 is WAN interface and eth1 is LAN interface):
# The primary network interface or the WAN Interface
auto eth0
iface eth0 inet dhcp
# This is second interface and all the LAN devices are attached here.
auto eth1

Now install isc-dhcp-server on your ubuntu gateway box:
root@VM-RTR:~# apt-get install isc-dhcp-server -y
root@VM-RTR:~# nano /etc/default/isc-dhcp-server


Just make that change above to your desired LAN interface. Our next stop is
root@VM-RTR:~# nano /etc/dhcp/dhcpd.conf
Look for following lines and make changes as you desire:

# option definitions common to all supported networks...
option domain-name "testlab.local";
option domain-name-servers 8.8.8.8, 8.8.4.4;
# If this DHCP server is the official DHCP server for the local
# network, the authoritative directive should be uncommented.
authoritative;
# DHCP server to understand the network topology.
subnet 10.0.7.0 netmask 255.255.255.0 {
range 10.0.7.10 10.0.7.25;
 option domain-name-servers 8.8.8.8,8.8.4.4;
 option domain-name "guest.local";
 option routers 10.0.7.1;
 option broadcast-address 10.0.7.255;
 default-lease-time 600;
 max-lease-time 7200;
}


And that should be enough to get us started.
root@VM-RTR:~# service isc-dhcp-server restart

This should set the router up. Now let’s configure the basic firewall rules now to allow traffic to flow properly. But before hitting iptables lets just configure the ip forward setting in our kernel. This is absolutely required to get this working.


root@VM-RTR:~# nano /etc/sysctl.conf
Make following changes:
# Uncomment the next line to enable packet forwarding for IPv4
net.ipv4.ip_forward=1 [The value must be 1]
# Uncomment the next two lines to enable Spoof protection (reverse-path filter)
# Turn on Source Address Verification in all interfaces to
# prevent some spoofing attacks
net.ipv4.conf.default.rp_filter=1
net.ipv4.conf.all.rp_filter=1 [The value must be 1]

Cool all set: Let’s configure the iptables. I usually create a file with all rules and then fire it to configure the firewall.
echo "- Setup variables and proc"
INT=eth1
EXT=eth0

#Getting the WAN ip as this is dynamic
EXTIP=`ifconfig eth0 | grep -E "inet " | cut -f 2 -d ":" | cut -f 1 -d " "`
#Making sure that the ip forwarding is enabled
echo 1 > /proc/sys/net/ipv4/ip_forward
IPT=/sbin/iptables
MPROBE=/sbin/modprobe

#LOAD KERNEL MODULES
$MPROBE -v ip_tables
$MPROBE -v ip_conntrack
$MPROBE -v iptable_filter
$MPROBE -v iptable_mangle
$MPROBE -v iptable_nat
$MPROBE -v ipt_LOG
$MPROBE -v ipt_REJECT

cho "- Flush firewall rules"
$IPT -F
$IPT -t nat -F
$IPT -t mangle -F

echo "- Delete custom chains"
$IPT -X
$IPT -t nat -X
$IPT -t mangle -X

echo "- Firewall default policies"
$IPT -P INPUT ACCEPT
$IPT -P FORWARD ACCEPT


echo "- Setup local interface"
$IPT -A INPUT -i l0 -j ACCEPT
$IPT -A OUTPUT -o l0 -j ACCEPT

echo "- Setup firewall SPI"
$IPT -A INPUT -m state --state established,related -j ACCEPT
$IPT -A FORWARD -m state --state established,related -j ACCEPT
$IPT -A OUTPUT -m state --state established,related -j ACCEPT
$IPT -t nat -A PREROUTING -m state --state established,related -j ACCEPT
$IPT -t nat -A POSTROUTING -m state --state established,related -j ACCEPT
$IPT -t nat -A OUTPUT -m state --state established,related -j ACCEPT

Now if you want to stop this LAN traffic from getting into your private LAN you can stop it here:
#STOP Traffic from entering x.x.x.x/24 LAN Segment
$IPT -A FORWARD -i $INT -o $EXT -s 10.0.7.0/24 -d x.x.x.x/24 -j DROP

#Configure the FORWARD RULES

$IPT -t nat -A PREROUTING -i $INT -s 10.0.7.0/24 -j ACCEPT
$IPT -A FORWARD -i $INT -o $EXT -s 10.0.7.0/24 -j ACCEPT
$IPT -t nat -A POSTROUTING -o $EXT -j SNAT --to-source $EXTIP
################################################################################$
echo "--> input to firewall"
#This will allow outside world to connect to your router on your WAN interface.
$IPT -A INPUT -i $EXT -m tcp -p tcp --dport 22 -j ACCEPT

And that’s it folks, you have successfully configured a vm running Ubuntu Server (headless) and made it a router. Now run multiple machines within this LAN segment and have fun.